Libarr Tutorial
Libarr is designed to be deployed via several docker containers. In addition to a reasonably modern/powerful device, you may want a domain name, and a way to access your server from outside of your local network. This page covers deployment steps, as well as many of the features included with Libarr.
Deploying Libarr
In order to run Libarr, you will need to prepare a few things. First, you must clone or download the project into your local filesystem. You will also need to have installed Python3, Docker, and optionally- own a domain name to self host the instance publicly.
Python
To run the Libarr installer you will need Python3 installed, as well as the dependencies in the deploy.py
script. In no particular order, you will need dotenv, pathlib, getpass, re,
string, secrets, subprocess, and os. Most of these are often already installed alongside python, but you may need to install them using pip install.
Docker
Download Docker
Libarr works across three Docker Containers on your machine, communicating in tandem to: host, manage, and serve your books. If you do not have Docker installed you will need to install it from the Docker download page, choosing the download that's right for your system. It has been tested primarily on GNU/Linux, but should work on Docker for Windows
Creating Docker Containers
With the simple deployment script, deploy.py, the only thing you have to do after installing prerequisites above is execute the command
python deploy.py from the root folder of the downloaded project. This CLI script will guide your through the process of creating a database password, an admin username/password, and configuring a few settings. Once this is done, an .env file will be created, which will be used to configure your Libarr instance specifics. This script may take some time to prepare the containers, but at the end,you should have three running containers.
Cloudflare/Domain Name
This step can be modified depending on how tech savvy you are, but the following is an easy way to have free access to your Libarr instance from outside your own network.
Domain Name
The first step is to acquire a domain name if you do not have one already. This can be bought from a variety of places, like CloudFlare, NameCheap, Domains.com, or any number of other registrars. If you aren't sure, I would recomend CloudFlare
Clouflare Account
Once you have your domain, we recommend setting up a free Cloudflare account. From here, you will be able to set up your domain to point to your running instance of Libarr. First, you'll need to add the domain. You can find the steps to do so here. You can leave the records alone, but will need to also update the nameservers, which can be done with the registrar you bought the domain from.
Next, we will be setting up a Cloudflare Zero Trust account. Zero Trust is a free and easy way to get access to your Libarr instance. The free tier has more than enough security features, tools, and active seats to make sure only you or your authorized users can gain access. We will be creating a Self Hosted Access Application, and then creating and connecting your Libarr instance to a tunnel. The links throughout can help you get this configured.
NOTE: Libarr, by default, runs on port 1337, so the url for your tunnel must be "localhost:1337". If you would like to change this, you will need to change the port used by Libarr in the Docker-Compose file. Just change the port number from '1337' to the specific port you would like to use. We also recommend you keep your access policies as strict as possible, for your own networks security.
After this, if your Libarr containers, and the cloudflare tunnel container, are up and running you should be able to navigate to your domain, login through Cloudflare, and access Libarr!
Libarr Screenshots and Walkthrough
Login and Homepage
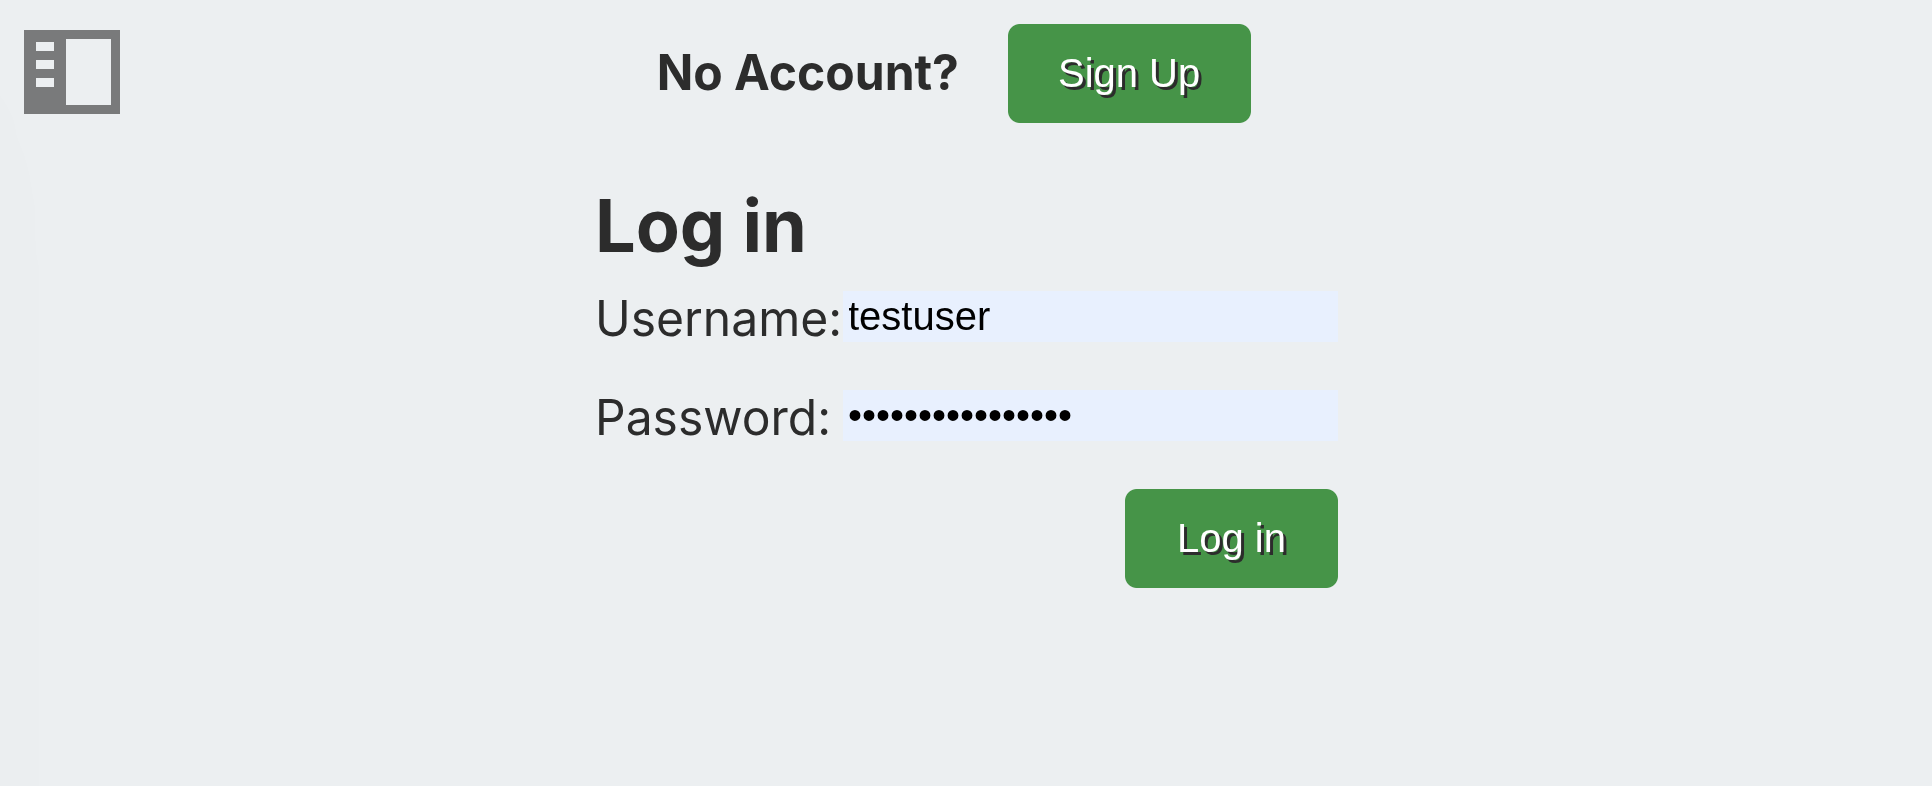
When first logging into a Libarr instance, users will be greeted with a basic login page. Admin user(s) will be able to login using the username and password configured when running the deployment script. Other users with access to the instance will also be able to register new accounts.
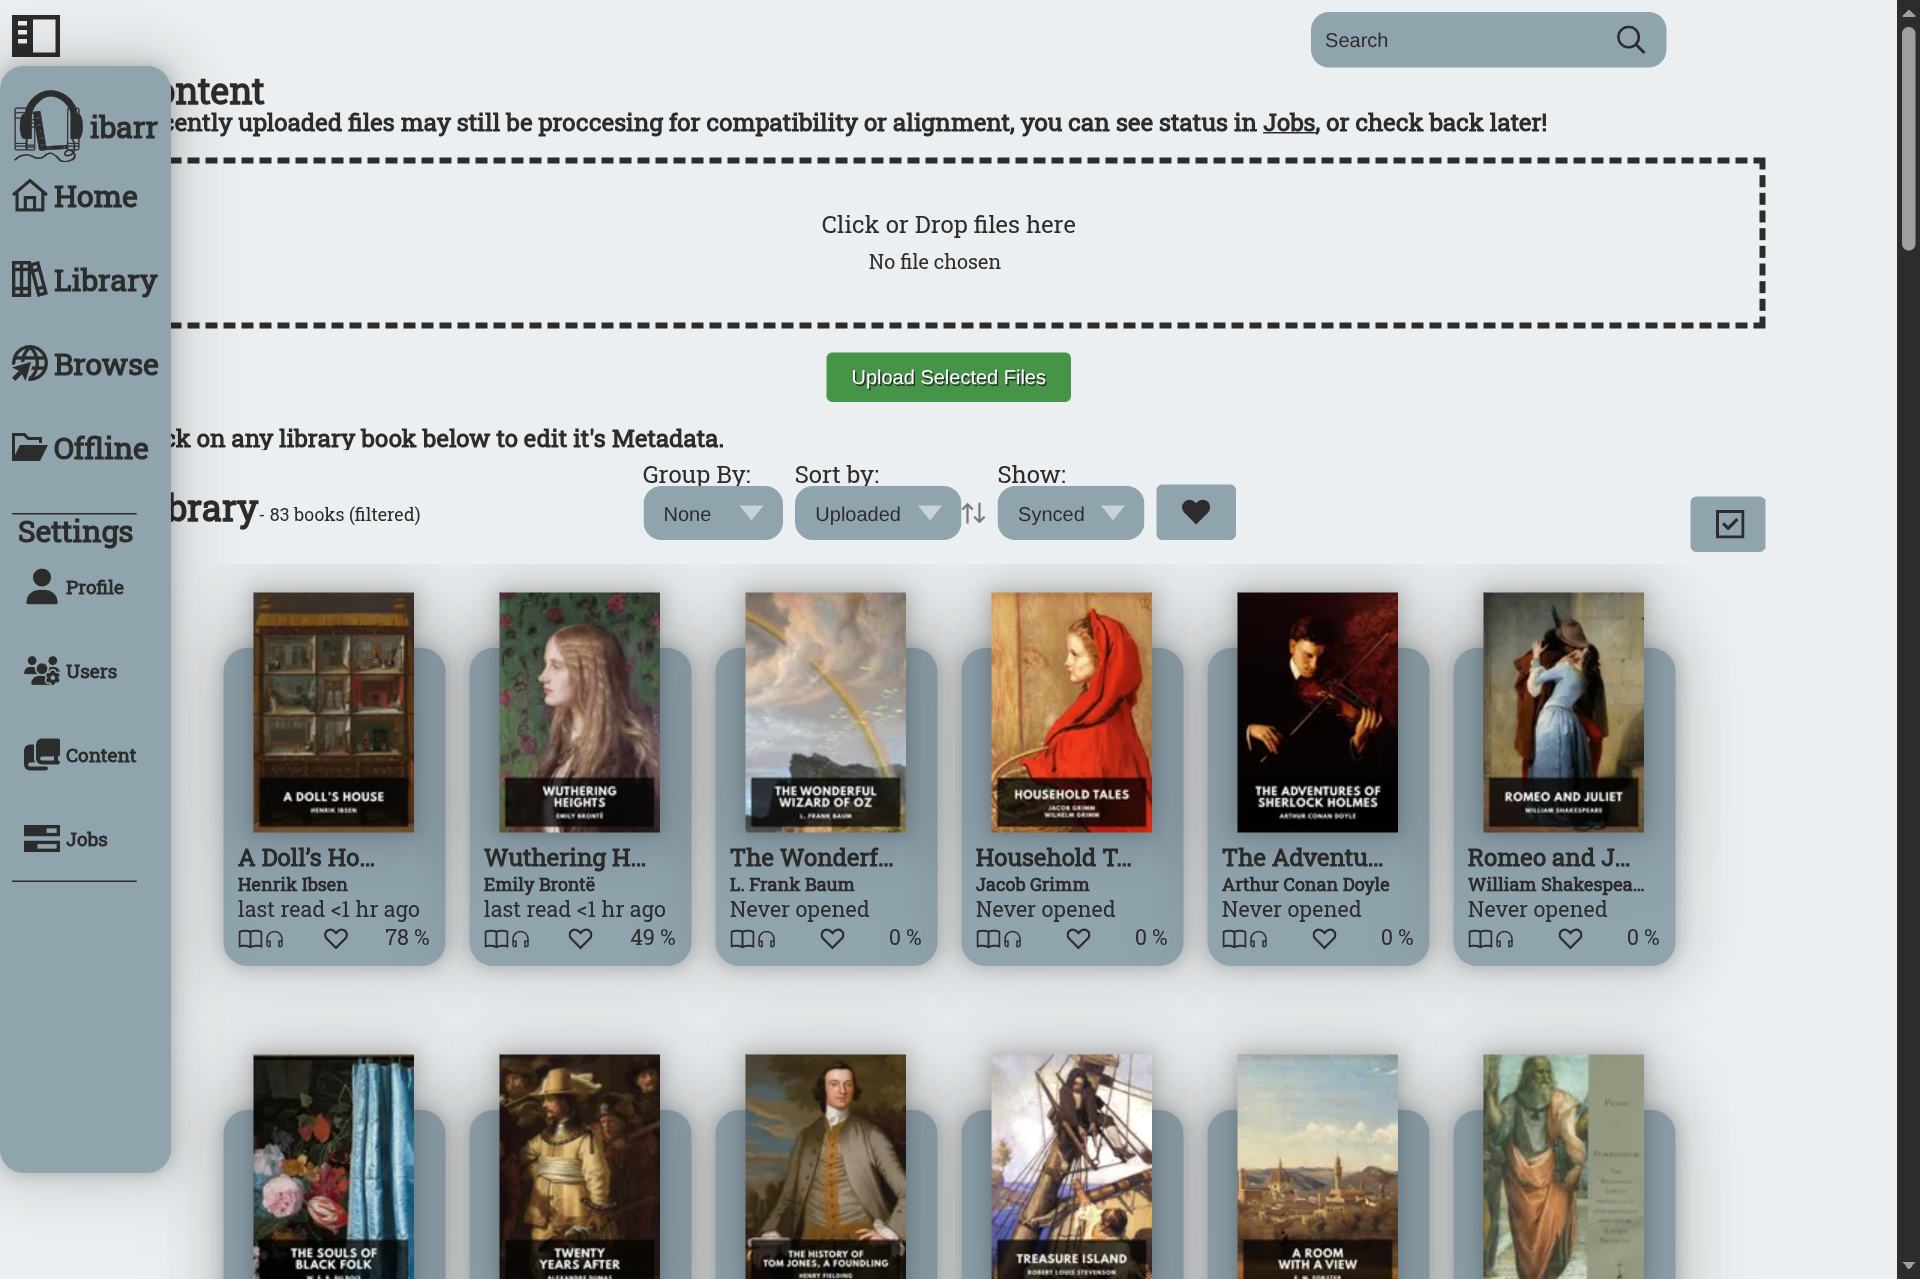
Once logged into the instance, users are greeted with the basic Libarr homepage. This homepage displays information about the books in the library, such as when they were last read, current progress, and the medium (textual, auditory, or comicbook) they were uploaded as. Books can be read by clicking on their library card.
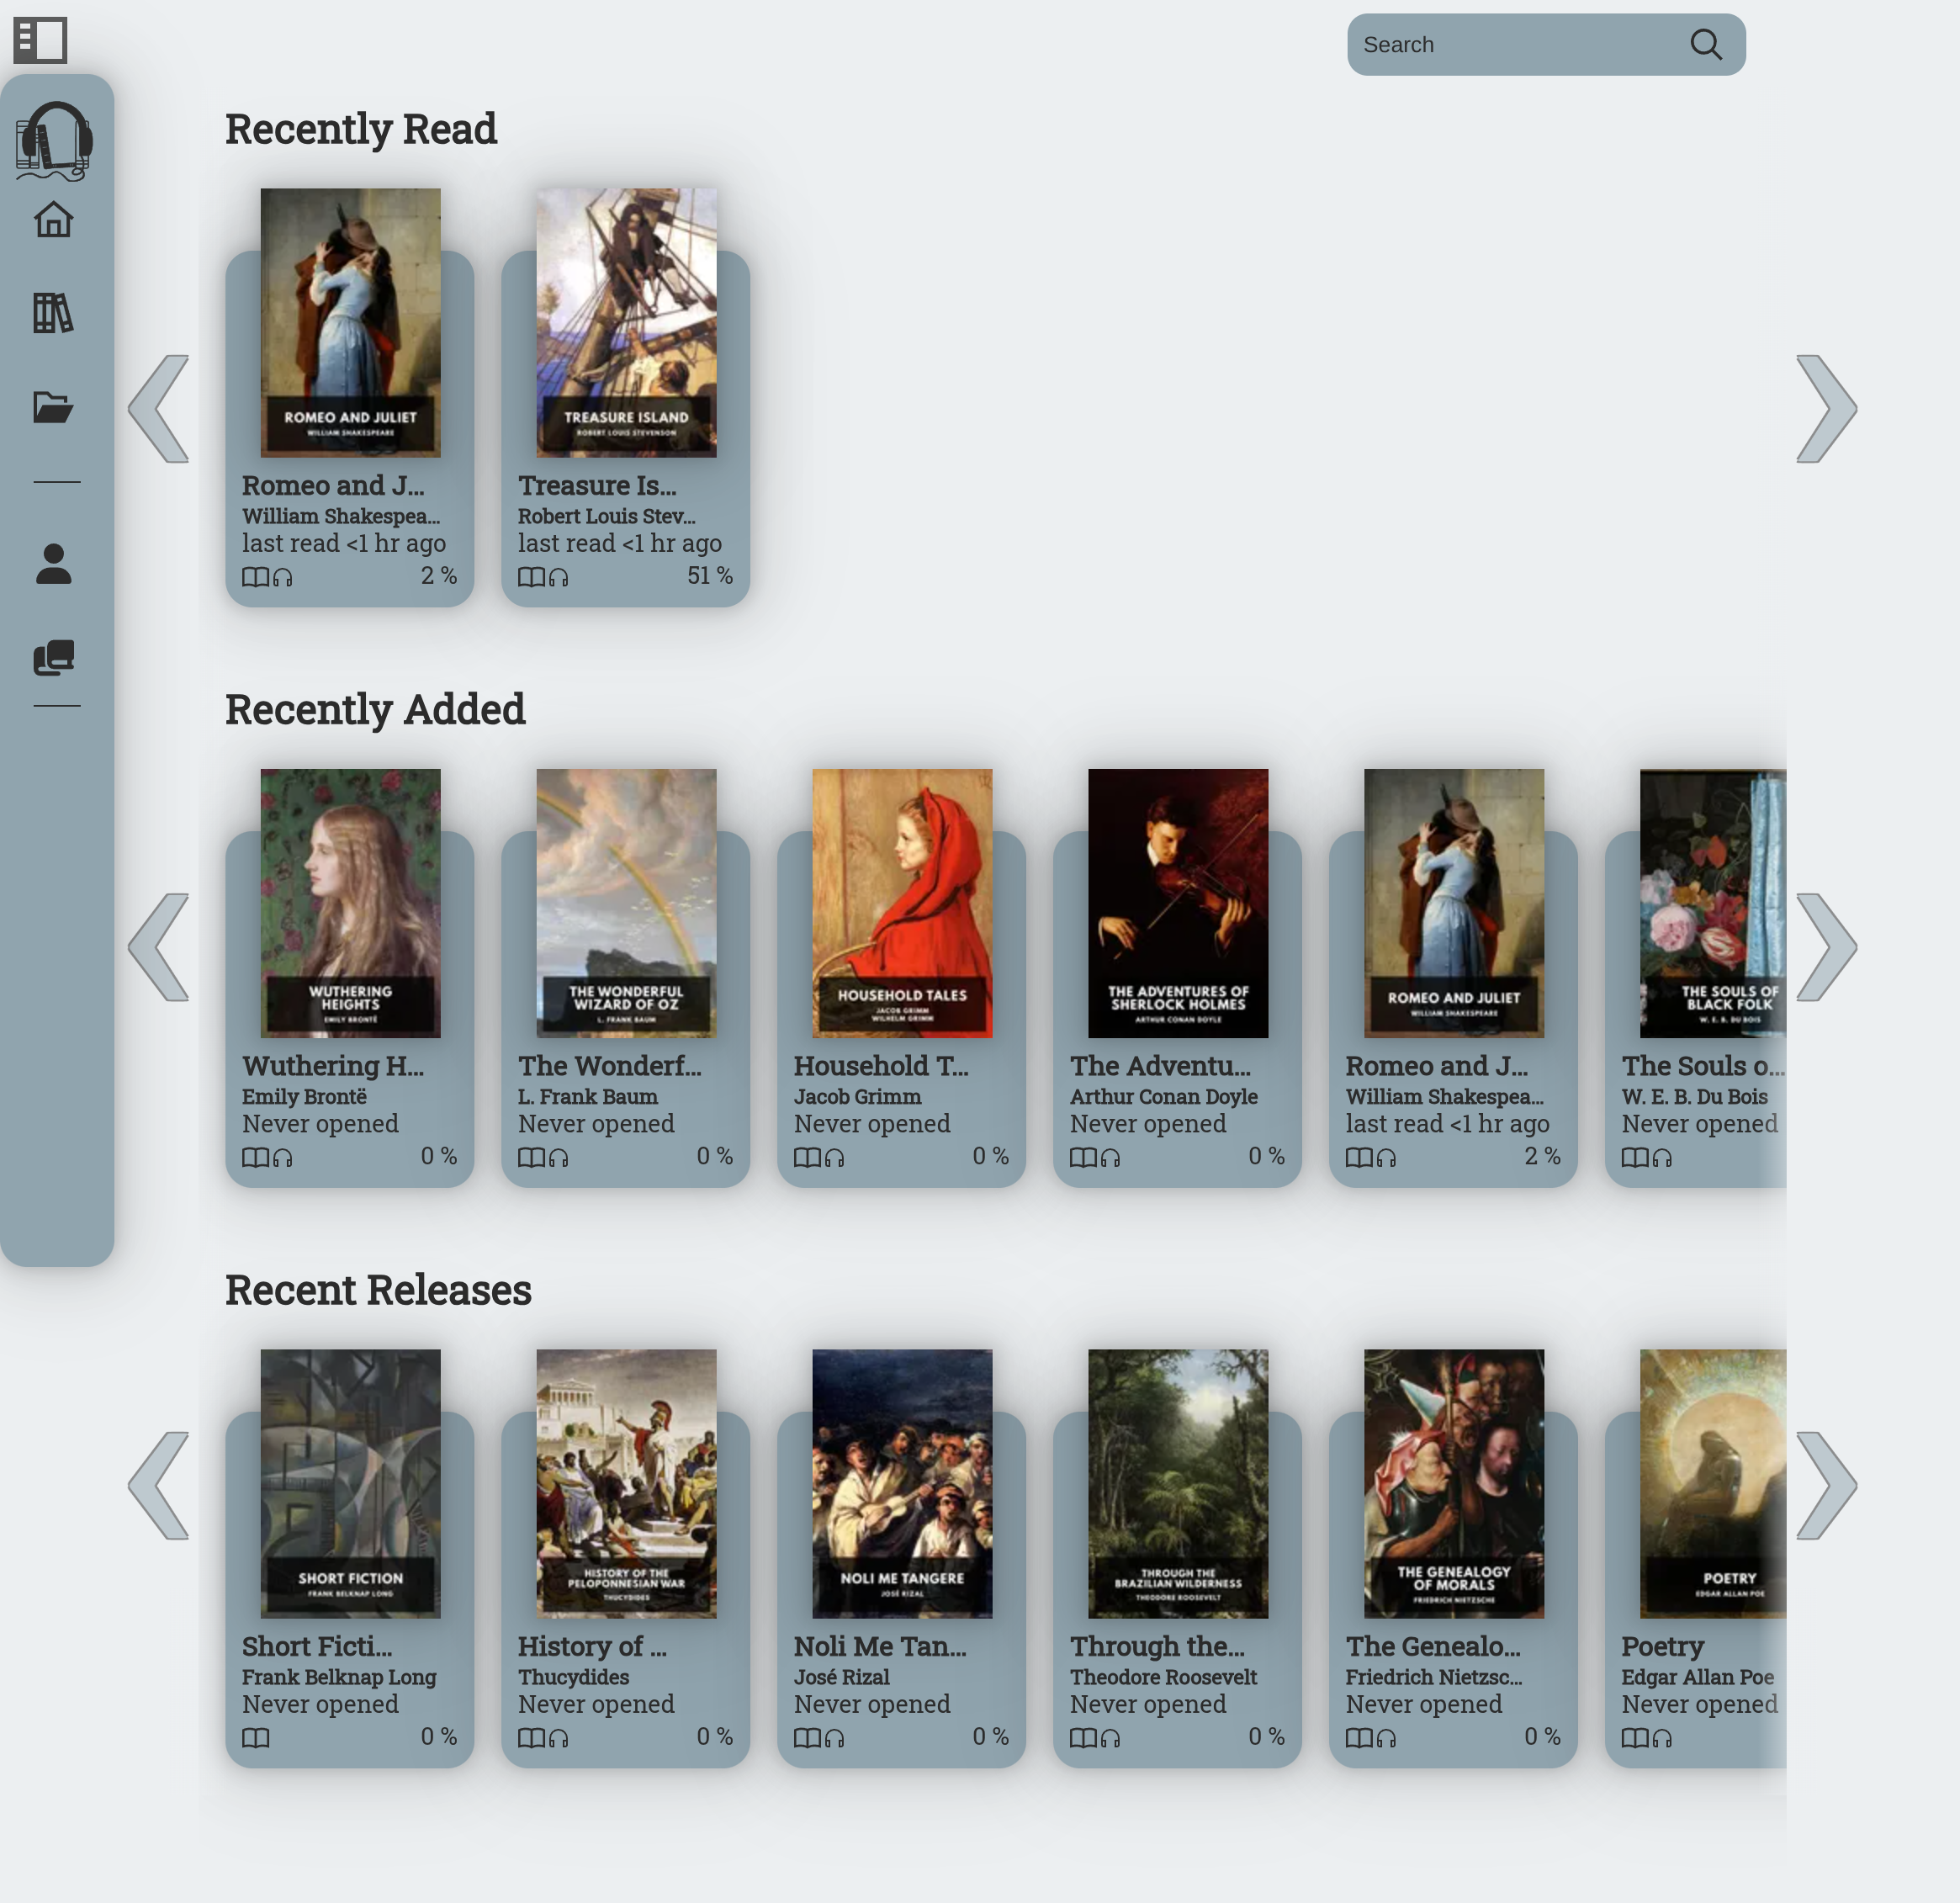
Users can navigate to the other pages inside of Libarr by using the collapsible sidebar. Depending on the current permissions the user has, they will be able to view their library, the offline player, browse for other public domain books to download, view their profile, manage users on their instance, and upload/manage content.
Profile Settings

From the 'Profile' screen, users are able to change their theme, UI styling, fonts, and homescreen layout. Users can also choose to override the default theme used by ebooks, with the current Libarr theme.
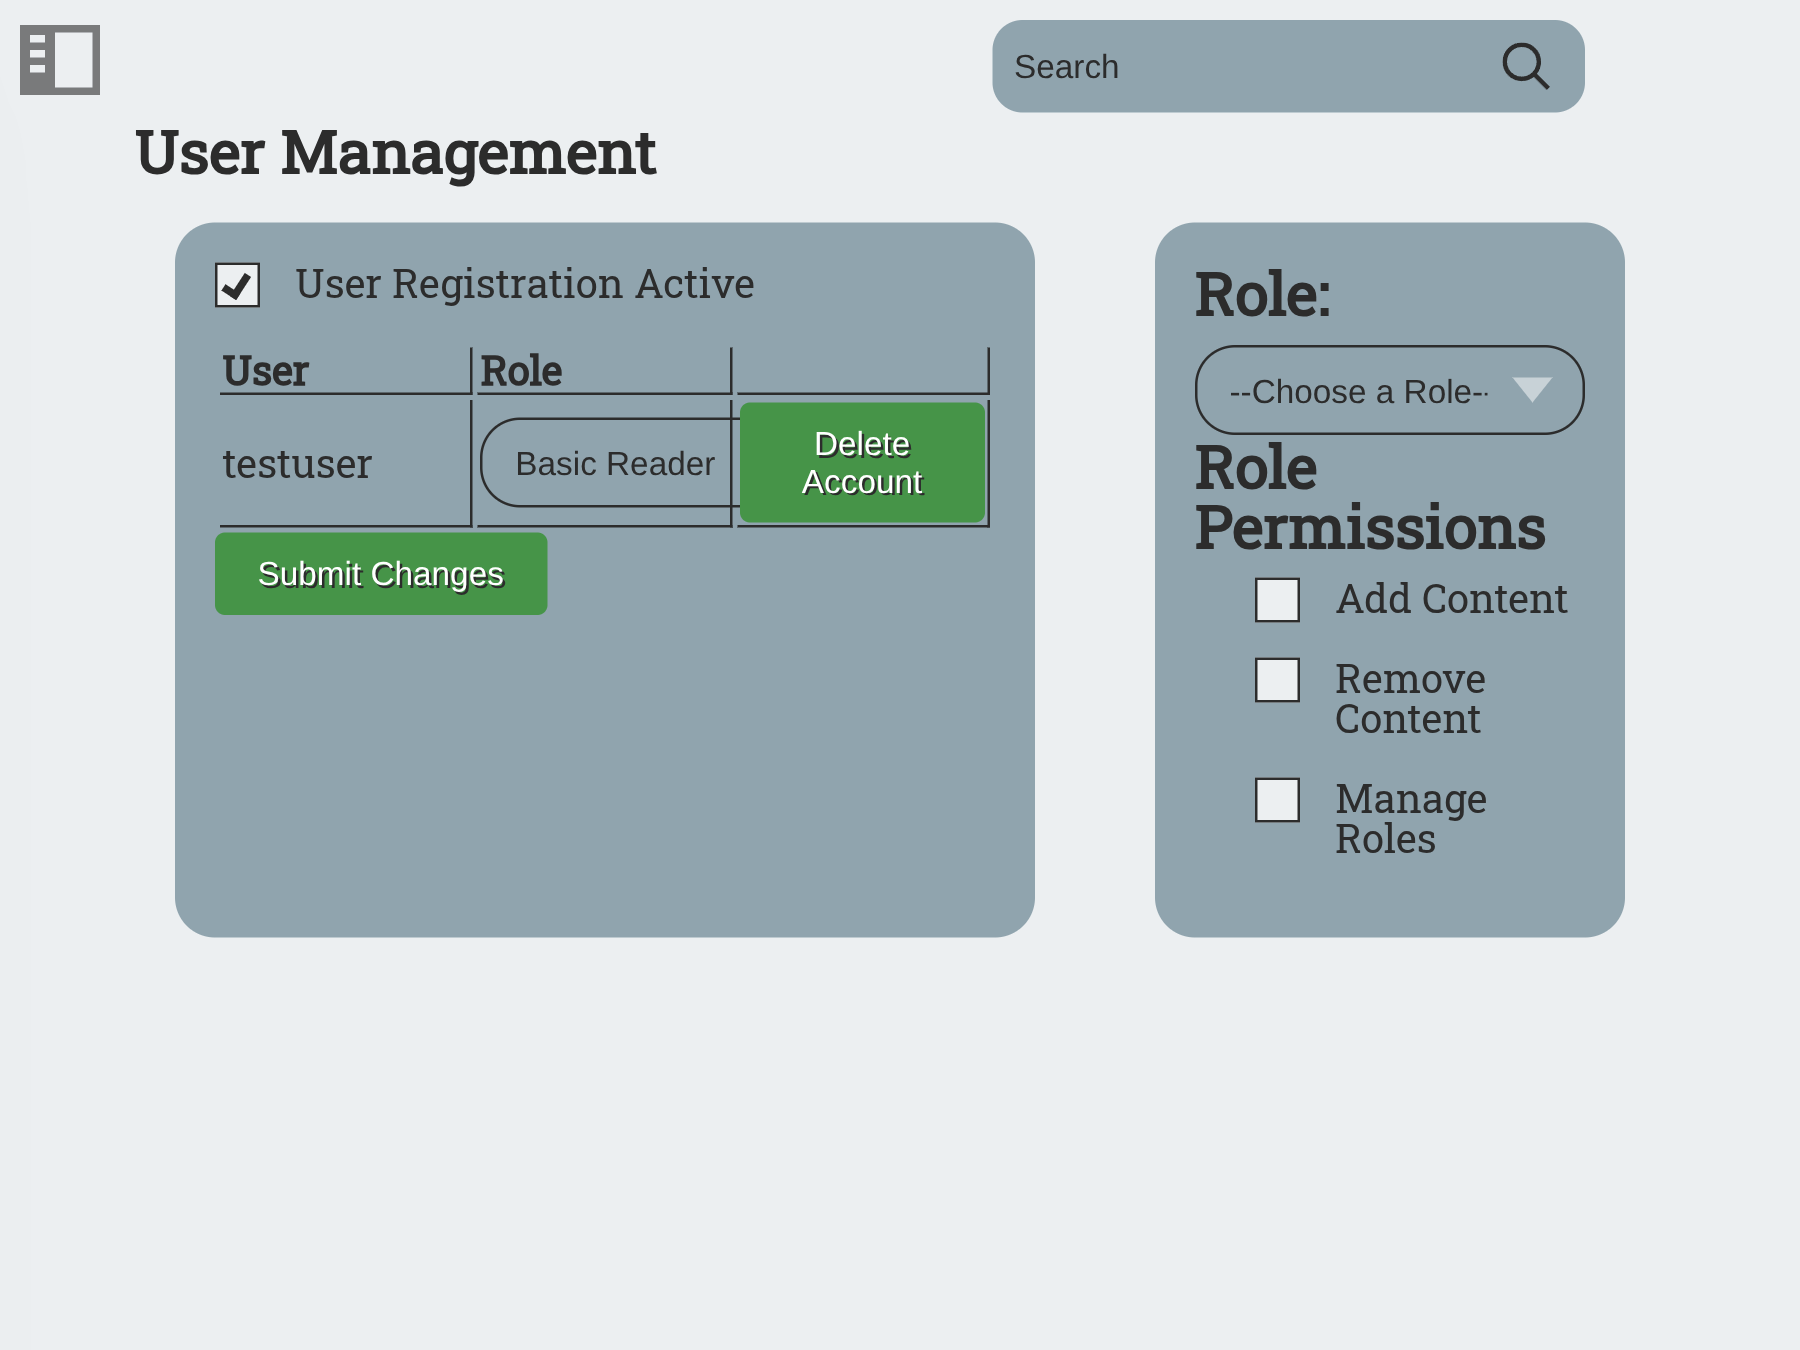
User Management
Only users with the correct permissions will be able to access this page (Admin users have access to all settings). From this page, authorized users can manage other user's current role, delete users, or create new roles with specific permissions.
The admin user for the instance can also enable/disable registration, further locking down who does and doesn't have access.
Content
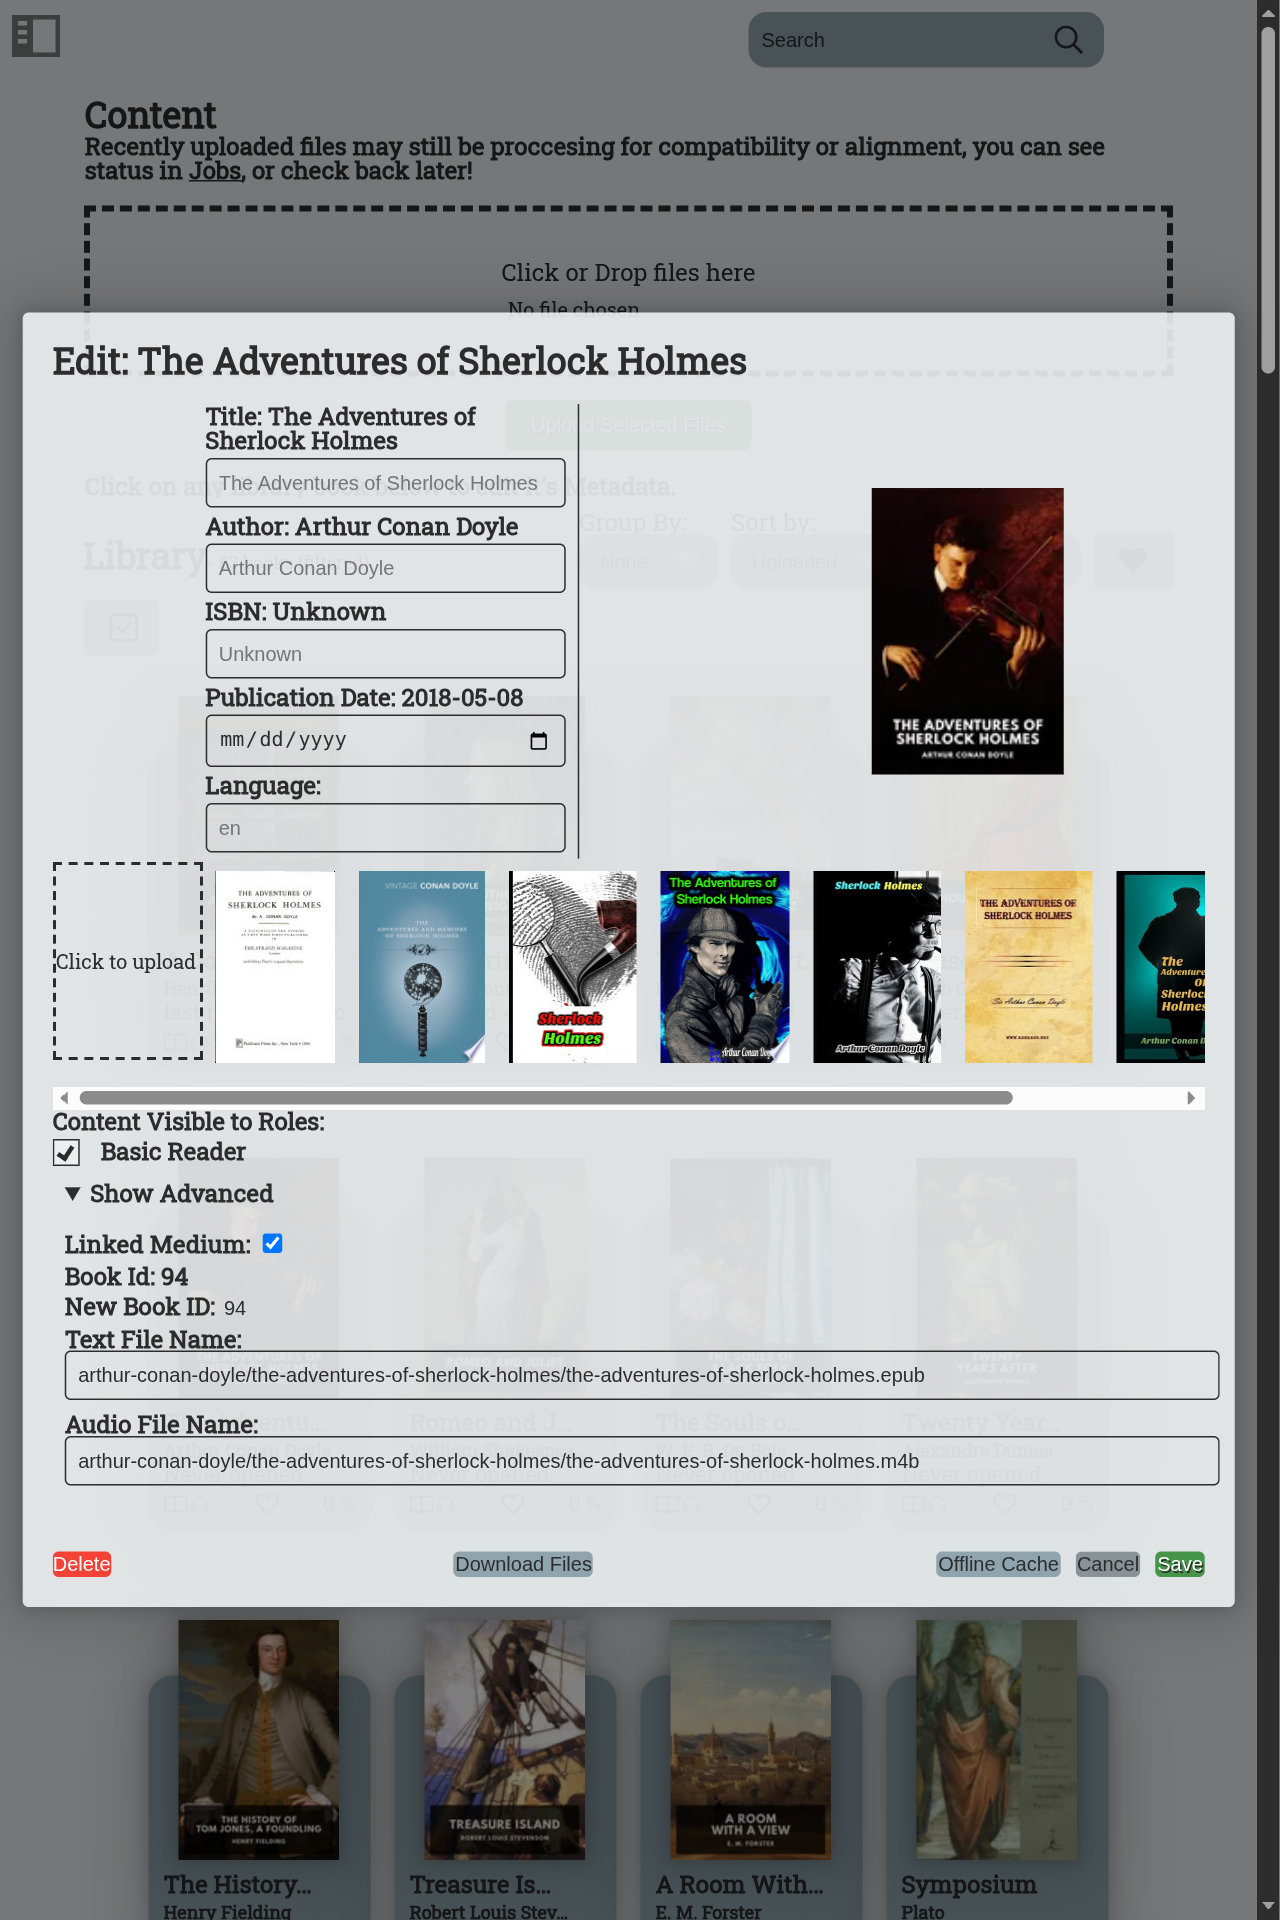
From the content page, authorized users can upload content. The preferred content types are .epub and .m4b, but Libarr will automatically convert most text or audio files for wider compatibility. If both the ebook and audiobook are uploaded for a book, Libarr can automatically (or manually) merge them into one Library 'card', where both mediums of the book can be accessed simultaneously and in sync one with the other.
Administrators can also edit the metadata of their books by selecting it on the content page. The cover photo can also be changed by clicking on the current cover image. Books can also be restricted (by Admin users only), keeping them from being viewed by specific user groups.
Ebook Reader and Audiobook Player
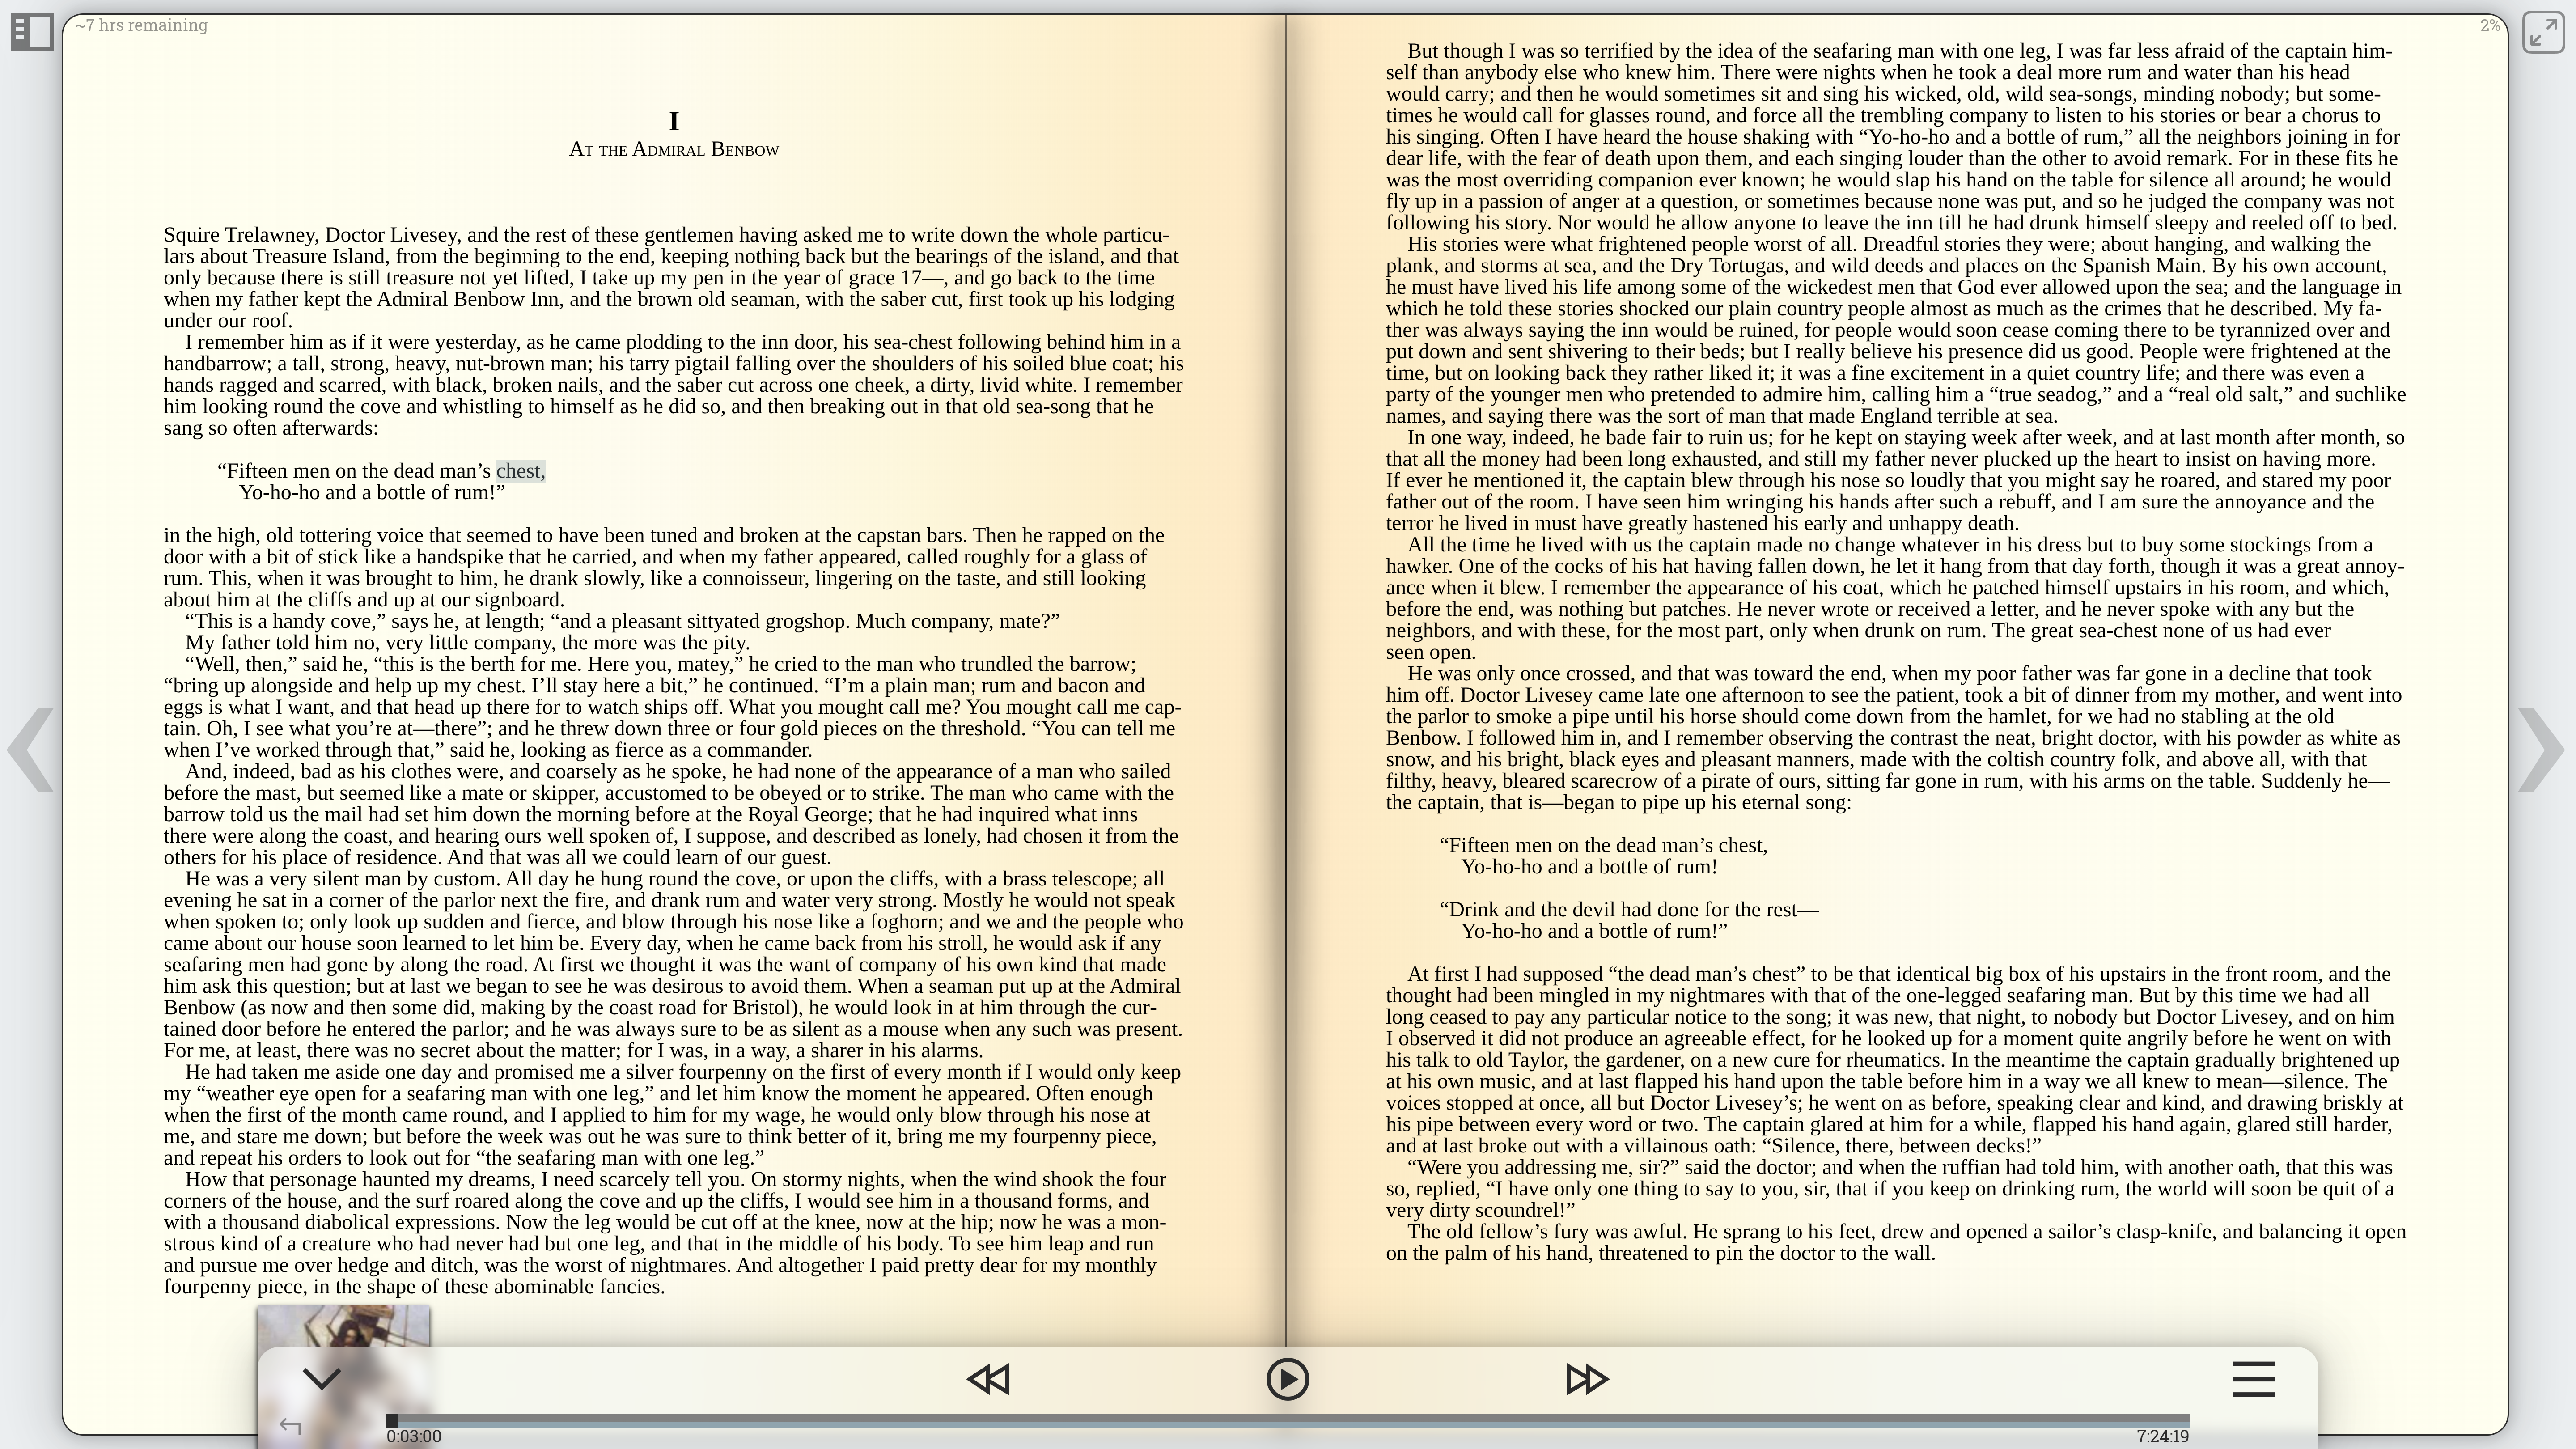
Books can be read and/or listened to from the 'Library' or 'Home' pages, by clicking on their title card.
The ebook reader comes with a number of features. By selecting a section of text, users can choose to highlight, bookmark, define, or lookup a word/phrase on Wikipedia. Users can also select the cog in the upper right corner to configure their ebook reader, selecting their preferred font, font size, and line-spacing.
To access their highlights or bookmarks, users can select the dropdown in the upper right-hand corner. This will display any highlights or bookmarks they've created. Users can also access the table of contents at any time by selecting the dropdown in the upper left-hand corner. Selecting a chapter will jump you to that position in the book.
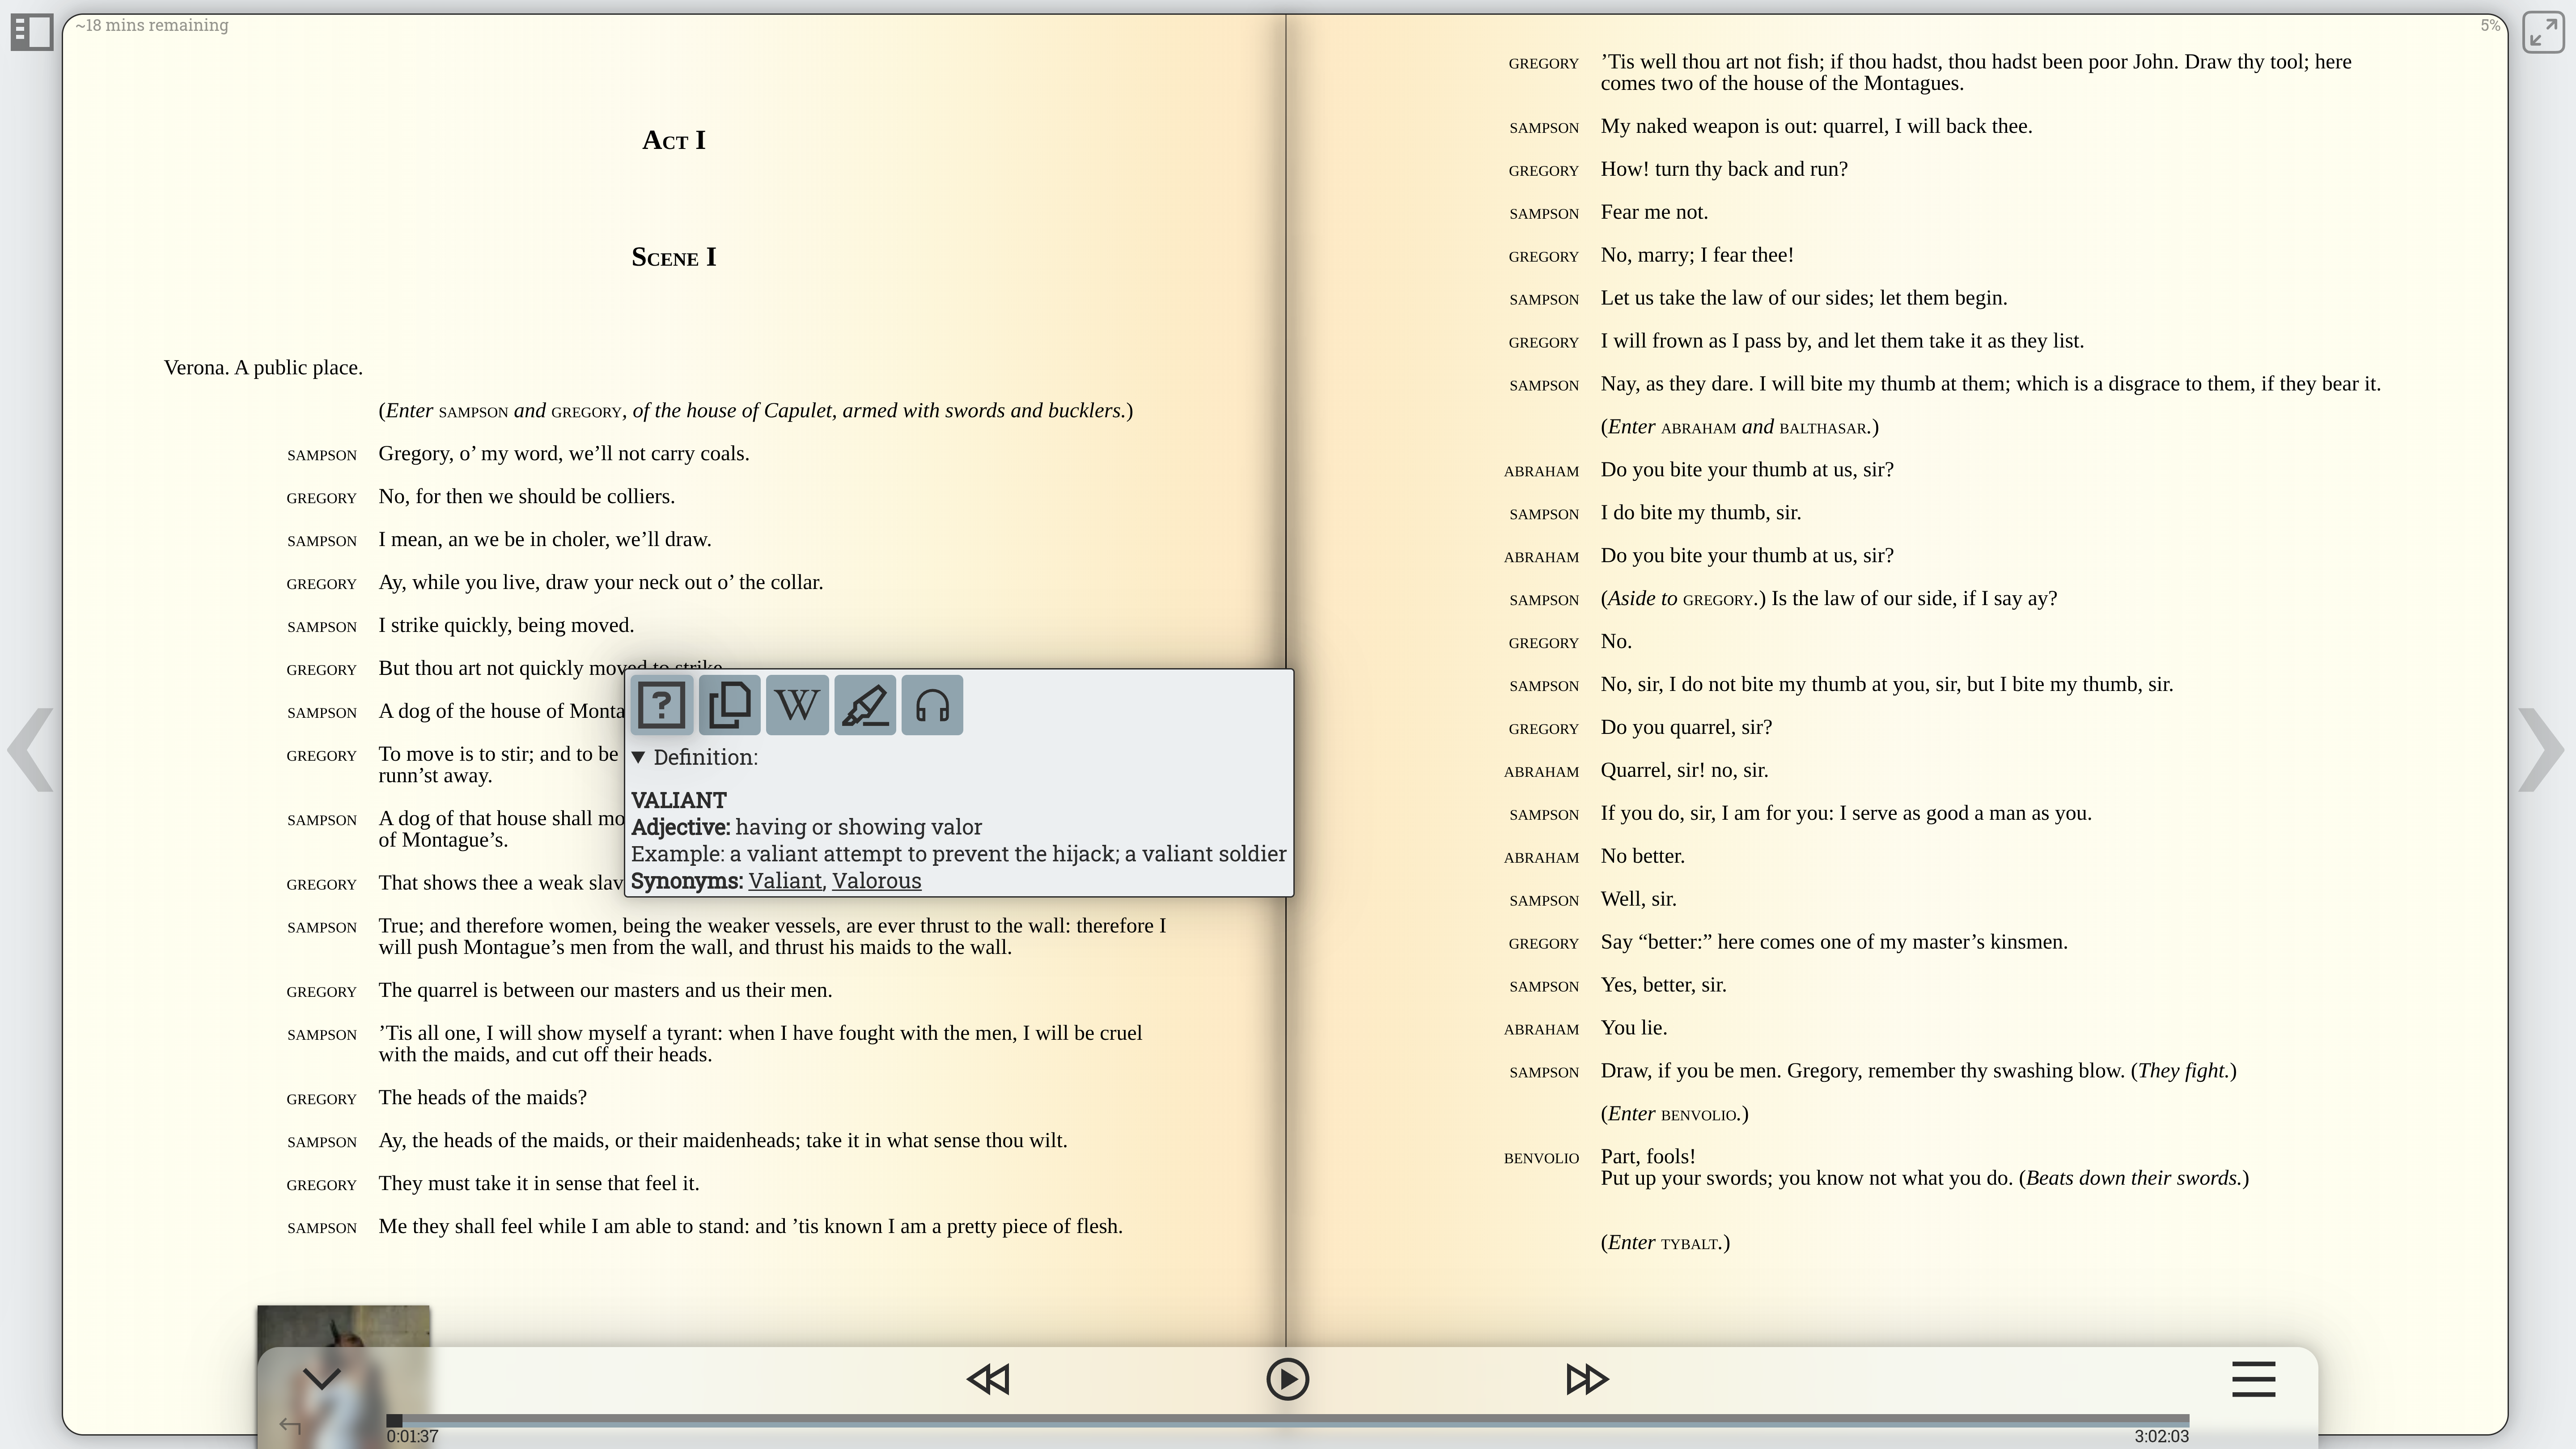
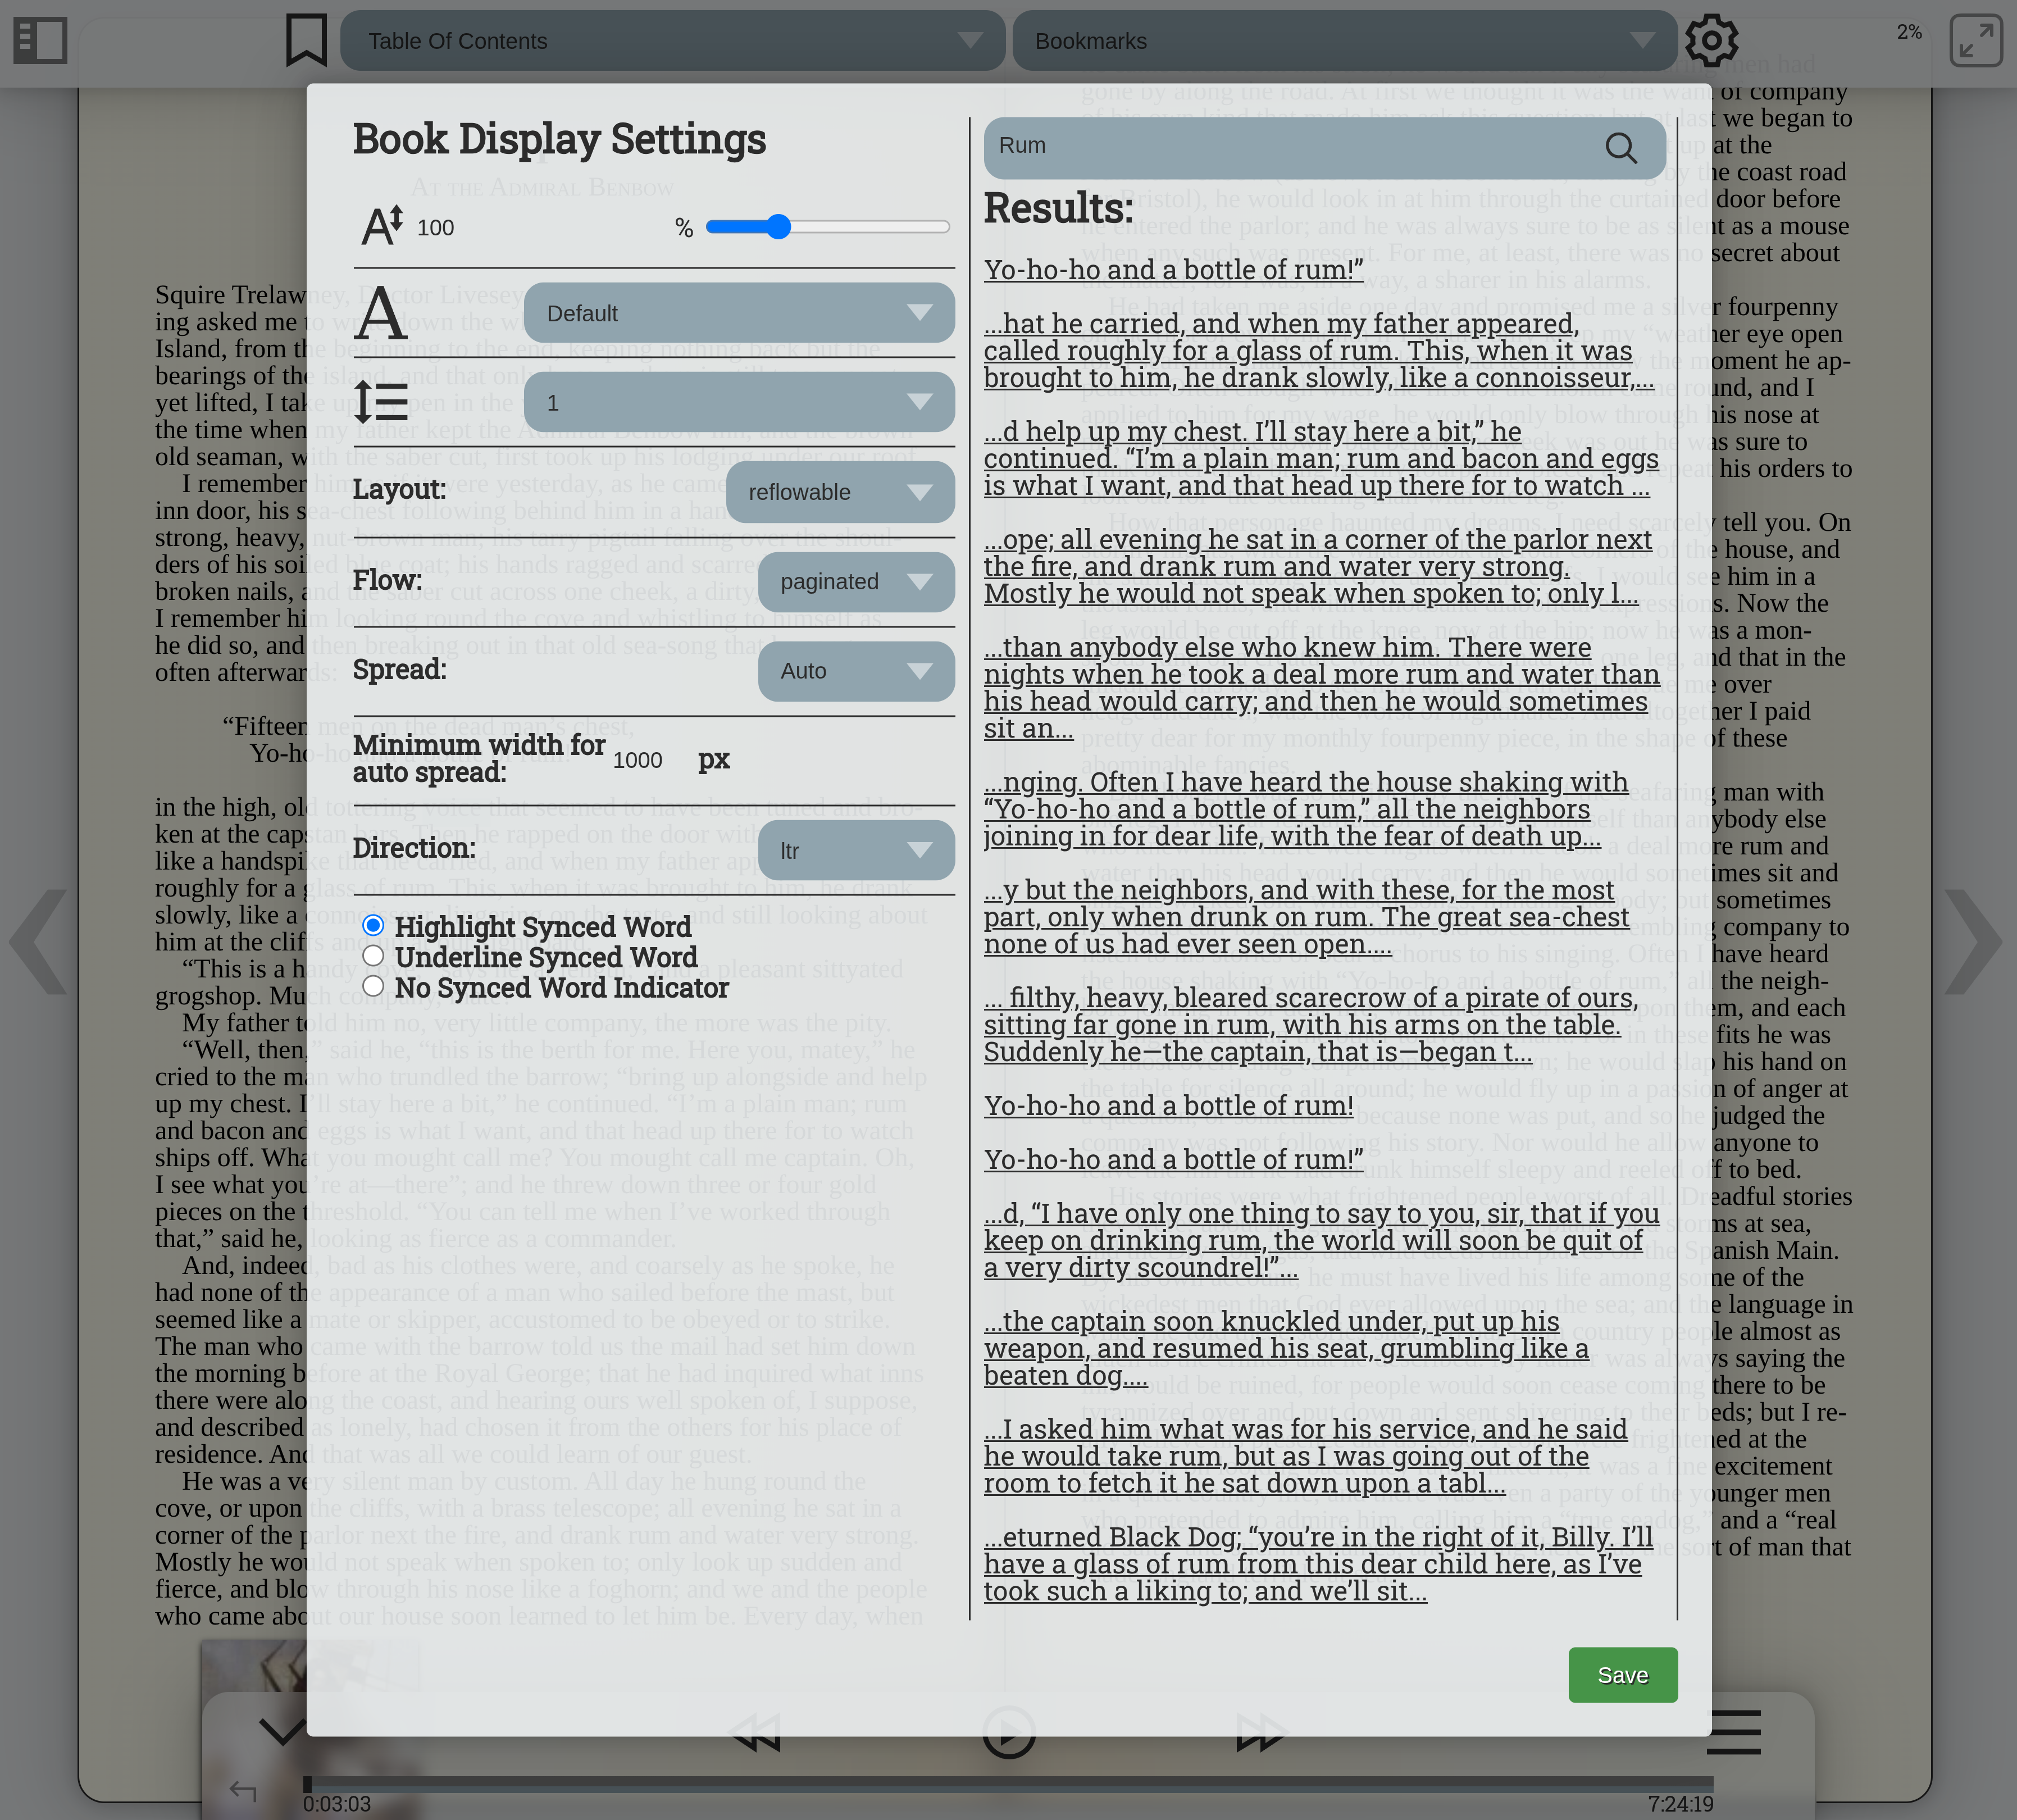
For books that are audio only/have both the ebook and audiobook uploaded, an audio player will be usable on the bottom of the screen. Using the audiobook player users can jump to a specific location in the book, modify playback speed, fast-forward, rewind, set a sleep timer, and adjust volume.
If both the ebook and audiobook have been uploaded for a specific title, readers can use a feature known as forced alignment to sync the textual and auditory progress of their book, in real time. When this occurs, playing the audiobook will cause the currently-spoken word to be highlighted on the ebook. This is an extremely helpful feature when consuming hard to read books, books in foreign languauges, or in any other circumstance where you want to read while you listen!